Using Shadowbox
Updated on October 1, 2024 • 4:30 Minutes to read
Updated on October 1, 2024
4:30 Minutes to read
The Shadowbox application is a smart browser that enables an authenticated end user to access multiple applications at once, transferring data safely and securely across their healthcare applications.
Logging in
Shadowbox is typically branded for each client, such that the application carries their brand name. For example, if you are using Shadowbox to process orders and results with your diagnostic lab or imaging center, the name of the application will likely be your lab’s name, and the icon for the application will carry your lab’s logo. For the sake of example, we’ll use ACME LABS as the example client.
To open the application, click on the application icon (shown below as ACME LABS). The application icon is likely located on your desktop, your taskbar, or in your downloads folder. If you are having issues with the installation or finding the application, please refer to the installation instructions

Enter your username and password. Your Username and your password will be provided to you by Shadowbox. It is recommended that you update the password after logging in for the first time. Once complete, click “LOG IN.”
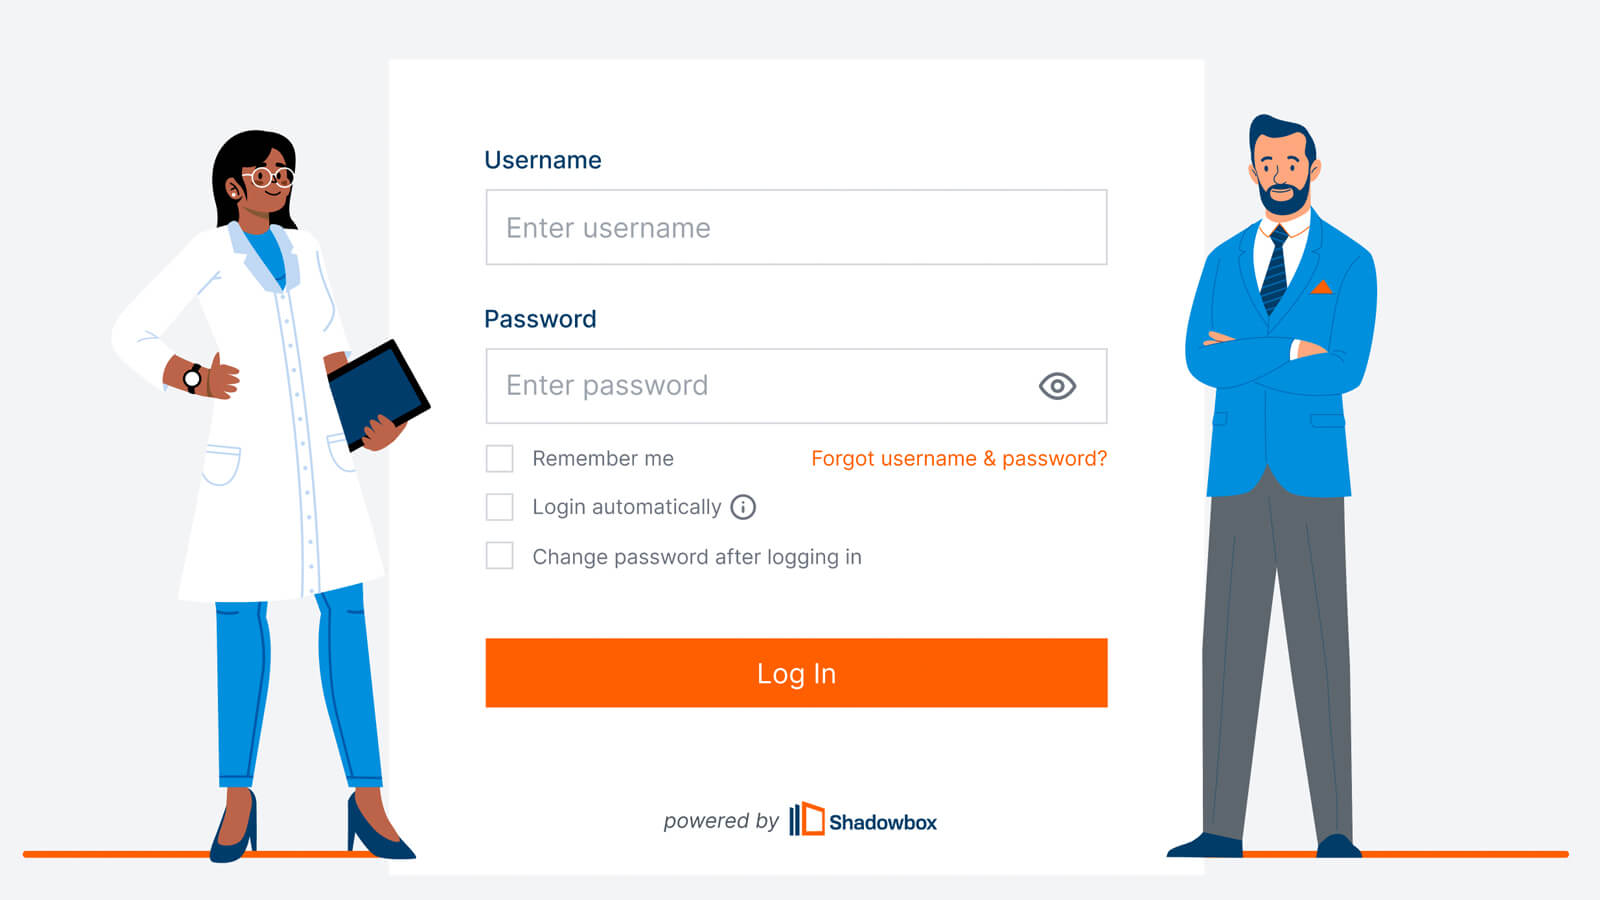
Remember me – If checked, the application will store the Shadowbox application credentials locally on the computer.
Login automatically – If checked, this will automatically log in the user once Shadowbox is opened.
Change password after login – If checked, this will prompt the user to update their password after clicking “LOG IN.” It is recommended that you update the password provided by Shadowbox upon first login.
Note: These passwords are not stored by your ancillary service provider (e.g., lab, imaging center, etc.) You may reset your Shadowbox password at any time by reaching out to Shadowbox at support@shadowbox.com.
Placing an order
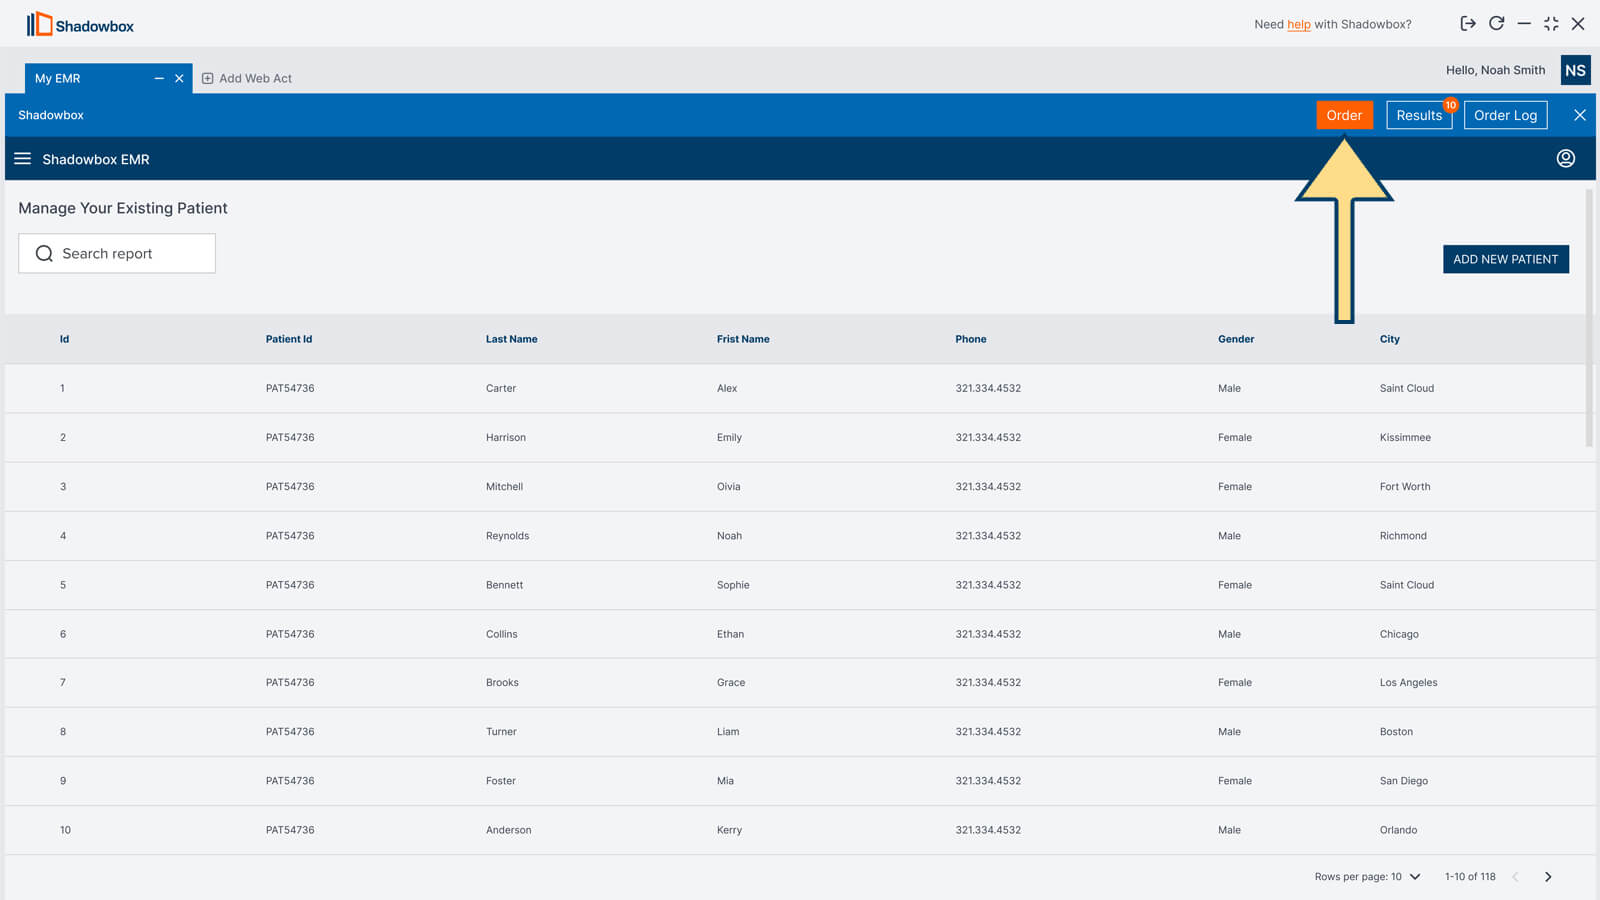
To place an order, you must first access the patient’s chart within the EHR displayed within the app. This generally requires searching for the patient, then clicking into the “information”, “hub” or “dashboard” tab of their chart.
Note: Shadowbox connects many different EHR’s, and accessing the patient’s chart may work differently in the EHR that you use.
When ready to order a lab, click “ORDER” in the top right-hand corner, as seen below (figure 1.5). Remember to have the patient’s chart open before ordering a test.
The Shadowbox App will automatically activate the online requisition form alongside the EHR, with the EHR on the left and the online requisition form on the right. (Figure 1.6) Certain patient information will automatically transfer from the EHR to the requisition, including but not limited to patient demographic information (patient name, insurance, address, date of birth), the location, and the ancillary service provider (e.g., lab, imaging center, etc.).
Note: Shadowbox is a custom-built application, and how and when information is transferred to the online requisition form may vary from customer to customer.
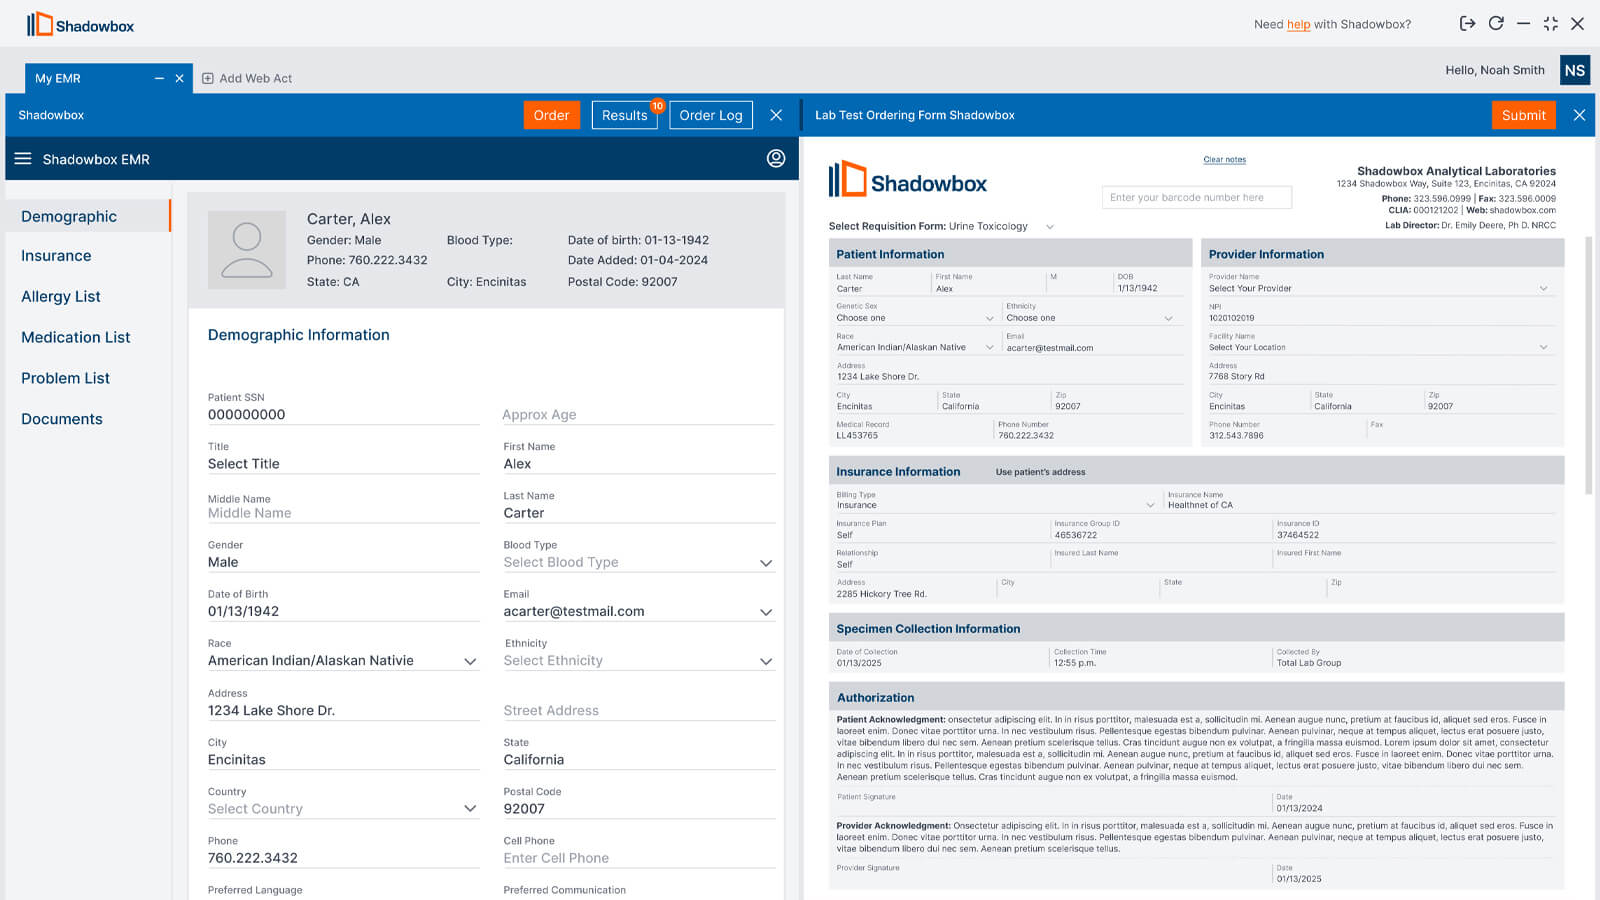
You may update the information on the form as needed. Your ancillary service provider (e.g., lab, imaging center, etc.) may also offer a selection of multiple requisition forms depending on the type of test you need. To fill in the requisition form, please follow these steps:
- Online Requisition Form: Using the online requisition located on the right of the screen, use the “Select Requisition Form” drop down menu to select the appropriate form, and scroll down to add the appropriate test type, test order, and diagnosis codes.
- Diagnosis Codes: Please note that the application may pull over all active diagnosis codes within the patient chart into the diagnosis code section. Or your digitized requisition form may contain a button to select diagnosis codes from a list. To select additional diagnosis codes, click the button and select whichever codes apply to the test order before clicking ‘OK.’
- Medications: The application may pull over all active medications automatically. From there, you can edit the information by adding additional medications or editing the data transferred from the chart. *Note this section is only required if it is included in your digitized requisition form. Please be sure to complete the digitized requisition as instructed by the ancillary service provider (e.g., lab, imaging center, etc.).
- Insurance Carrier: The patient’s insurance is automatically pulled from the patient's chart and added to the order. The information included is, the subscriber, guarantor, policy ID, and insurance name, and will only appear if active in the patient chart. Please verify all insurance information is up to date and accurate so that the lab or imaging center has the information needed prior to submitting the order. If the lab or imaging center requires a copy of the insurance card, please print and send it with the order. If you have any questions about which information is required to submit a test, please reach out to your lab or imaging center representative.
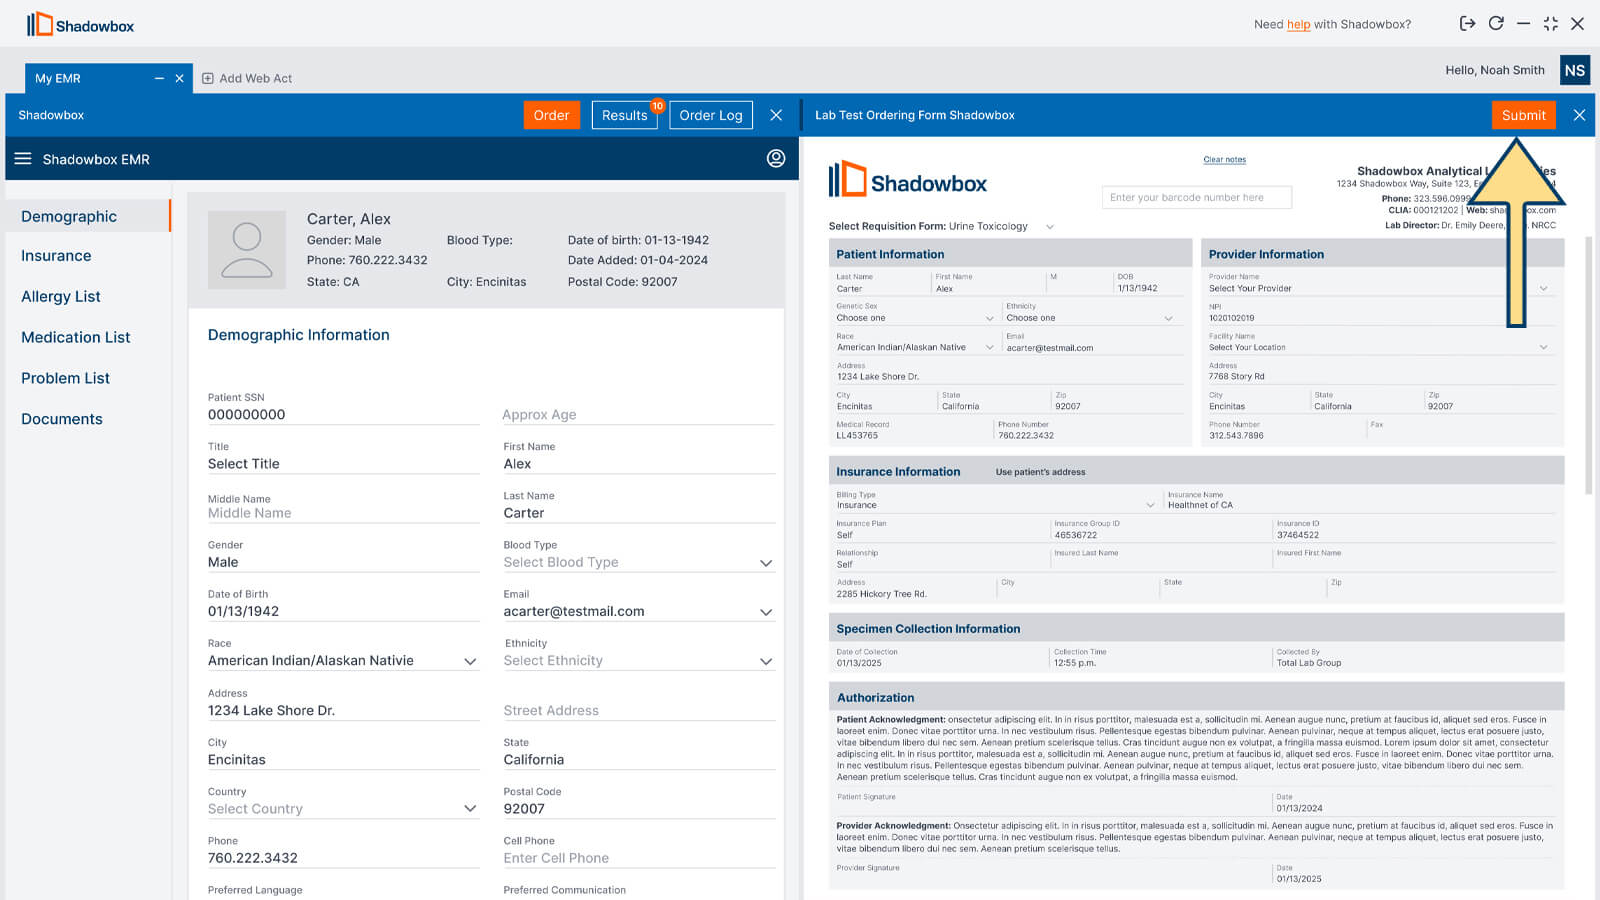
When finished, click the “SUBMIT” at the top of the screen (Figure 1.7). If the requisition is incomplete, you will be prompted to input missing information prior to submission. Once a requisition is submitted, Shadowbox will convert the order to a PDF file that will appear for you to print. The order is electronically sent to your lab or imaging center, and the pdf file is transferred to the EHR, available to download or print.
Reviewing & processing results
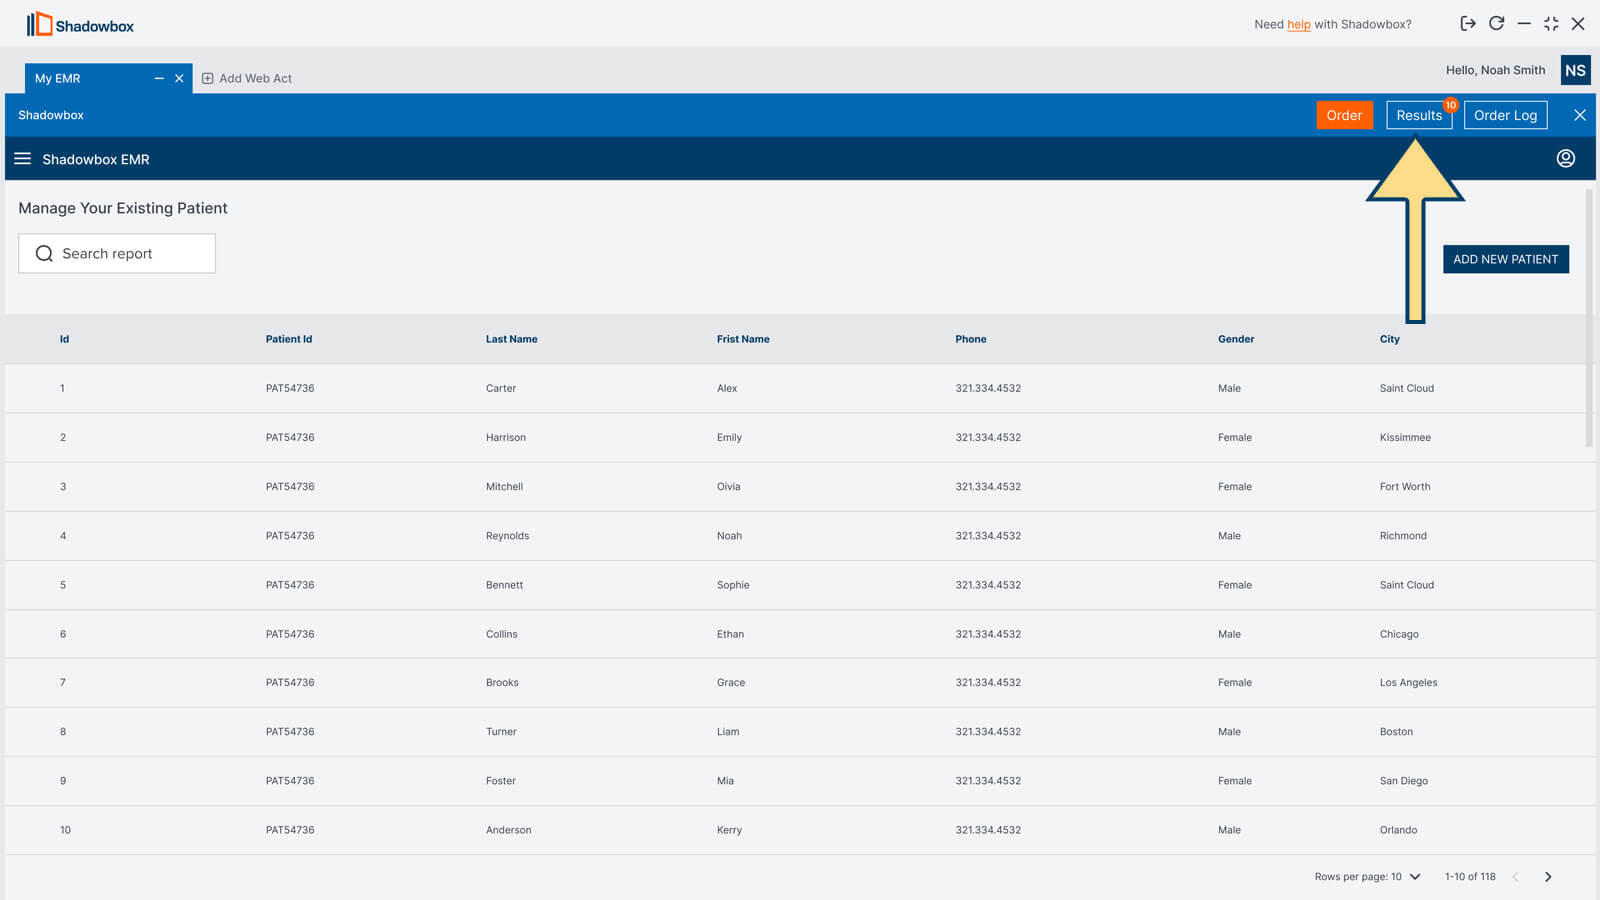
To view and process results, you will need to click on the results box in the top right-hand corner of the screen as shown below. (Figure 1.8)
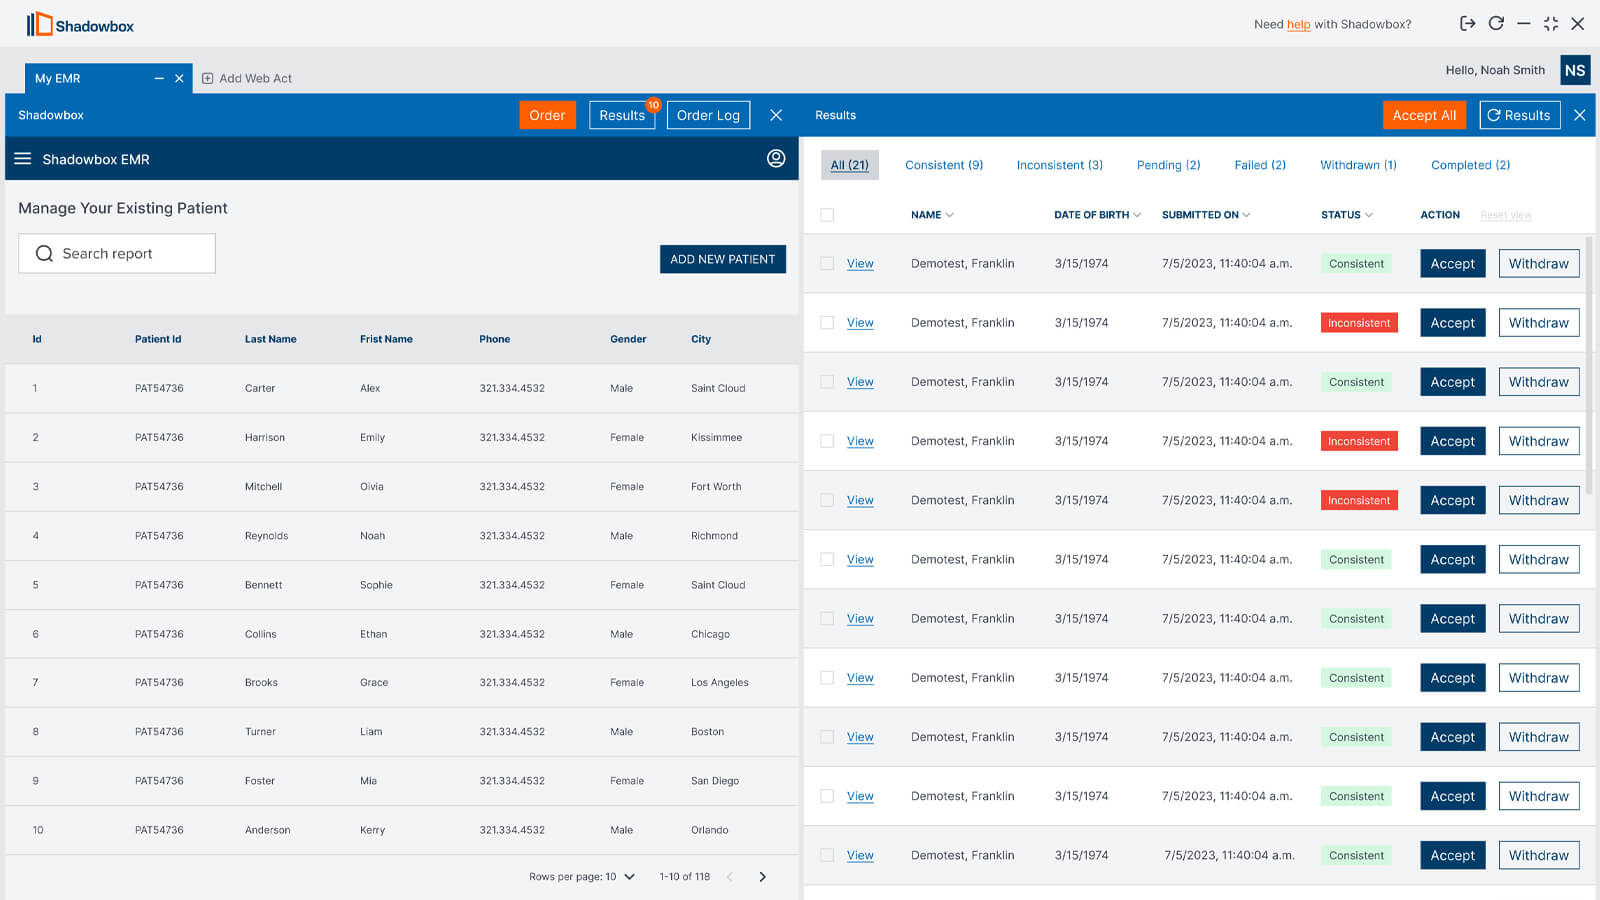
The results will load as a list on the right side of the screen, with your EHR on the left side of the screen, as shown below. (Figure 1.9)
About Results Processing
You can click on the results button in the top right of the screen from any screen within your EHR. When you select results from the list of results on the right side of your screen, Shadowbox will search for the matching patient. Click view/accept or click accept to the right of a result report and the system will search for the matching patient chart and save a pdf version of the results to that patient’s chart.
Please be sure to check the “Failed” tab to ensure that any results without a matching patient chart are viewed/accepted manually. Please see the instructions below for details on how to upload results when the patient is not matched automatically.
You can view and accept results by following the instructions provided below. Shadowbox also offers a premium feature that enables fully automated results processing. Please contact our support team at support@shadowbox.com for more information.
Note: Shadowbox also offers a premium feature that enables fully automated results processing. Please contact our support team at support@shadowbox.com for more information.
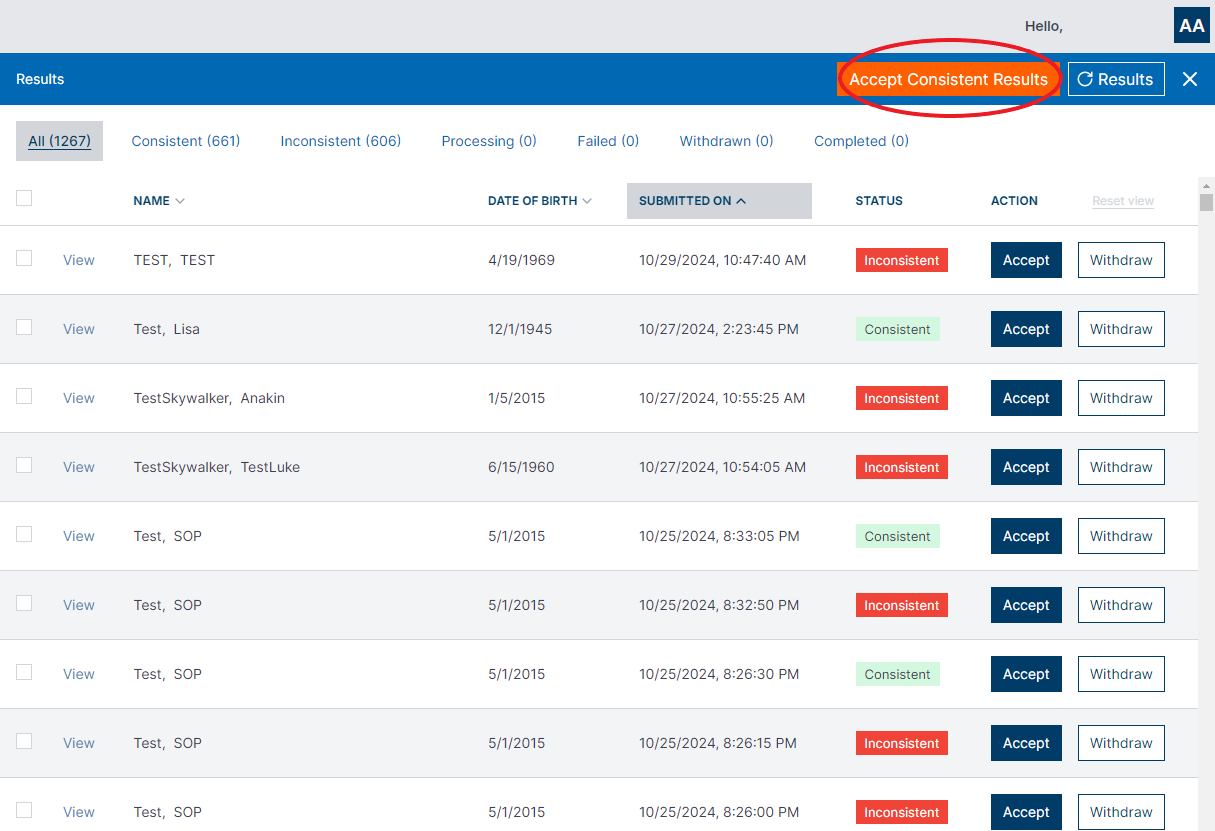
Accept Consistent Results (Accept All):
- Click on the Accept Consistent Results button top right. (Figure 1.10)
- In the “Action” column, it will show as Processing, then as Accepted, and then categorized under the Completed tab in the results log with the date and time of completion.
Accept Multiple Consistent Results (Not All):
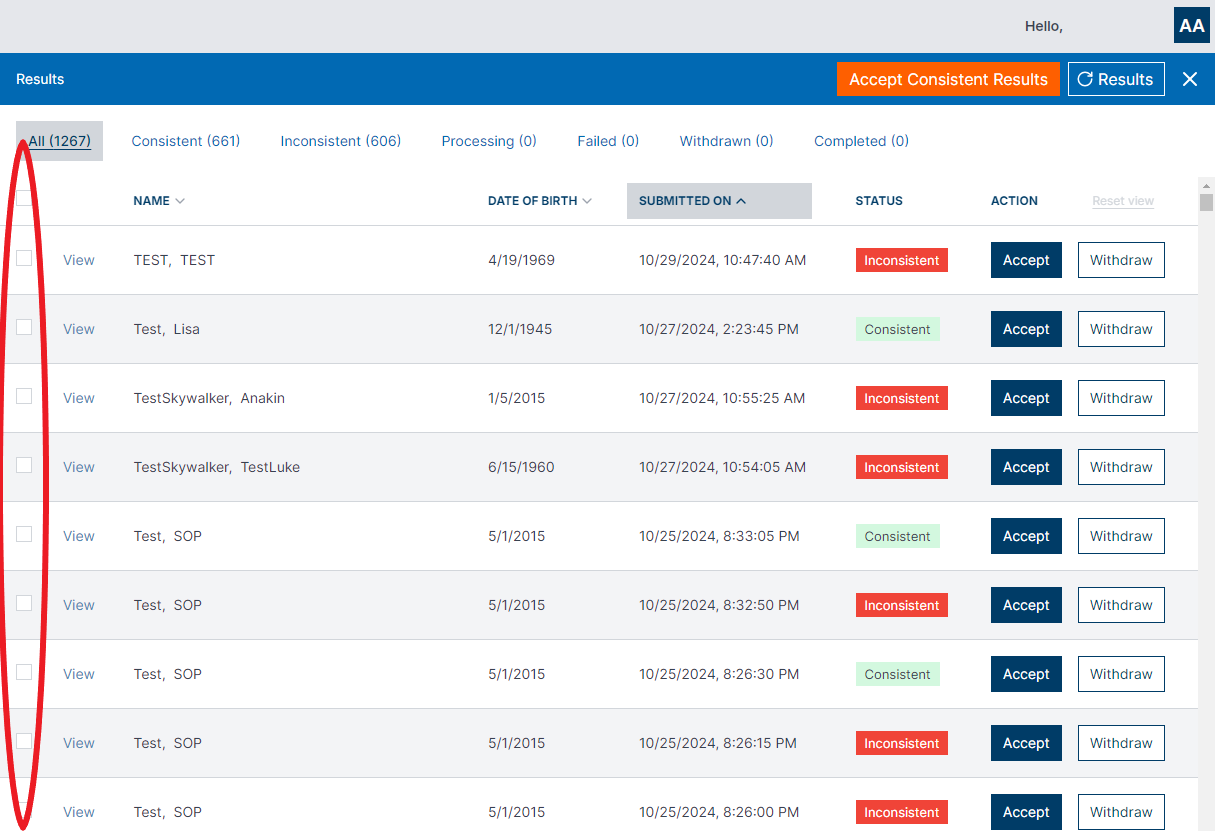
- Click the check box to the left of each desired consistent result report. (Figure 1.11)
- The total number of results selected will appear at the top center results log under the various categories (Example: 3 results are selected.)
- Click on the “Accept Results” button to the right of the message.
- In the “Action” column, it will show as Processing, then as Accepted, and then categorized under the Completed tab in the results log with the date and time of completion.
Accept Multiple Inconsistent Results (Not All):
- Click the check box to the left of each desired inconsistent results report.
- The total number of results selected will appear at the top center results log under the various categories (Example: All 2 results are selected).
- Click on the “Accept Results” button to the right of the message.
- In the “Action” column, it will show as Processing, then as Accepted, and then categorized under the Completed tab in the results log with the date and time of completion.
Accept a single result to a matching patient’s chart (in view mode):
- Click on the “Results” button.
- Click “View” to the left of the results report.
- System will search for the matching patient chart and if it is found, will open that patient’s chart (even if another patient chart is open at the same time, it will open the new matching patient chart, and you can use the tabs within the window to navigate between the two patient charts).
- Ensure the desired patient chart is the one appearing on the left of the screen.
- Click “Accept” at the top right of the open report window.
- Accepted will appear in the top right corner of the results log to confirm it saved successfully to the matching patient’s chart.
Accept a single result without viewing:
- Click on the “Results” button in the top right.
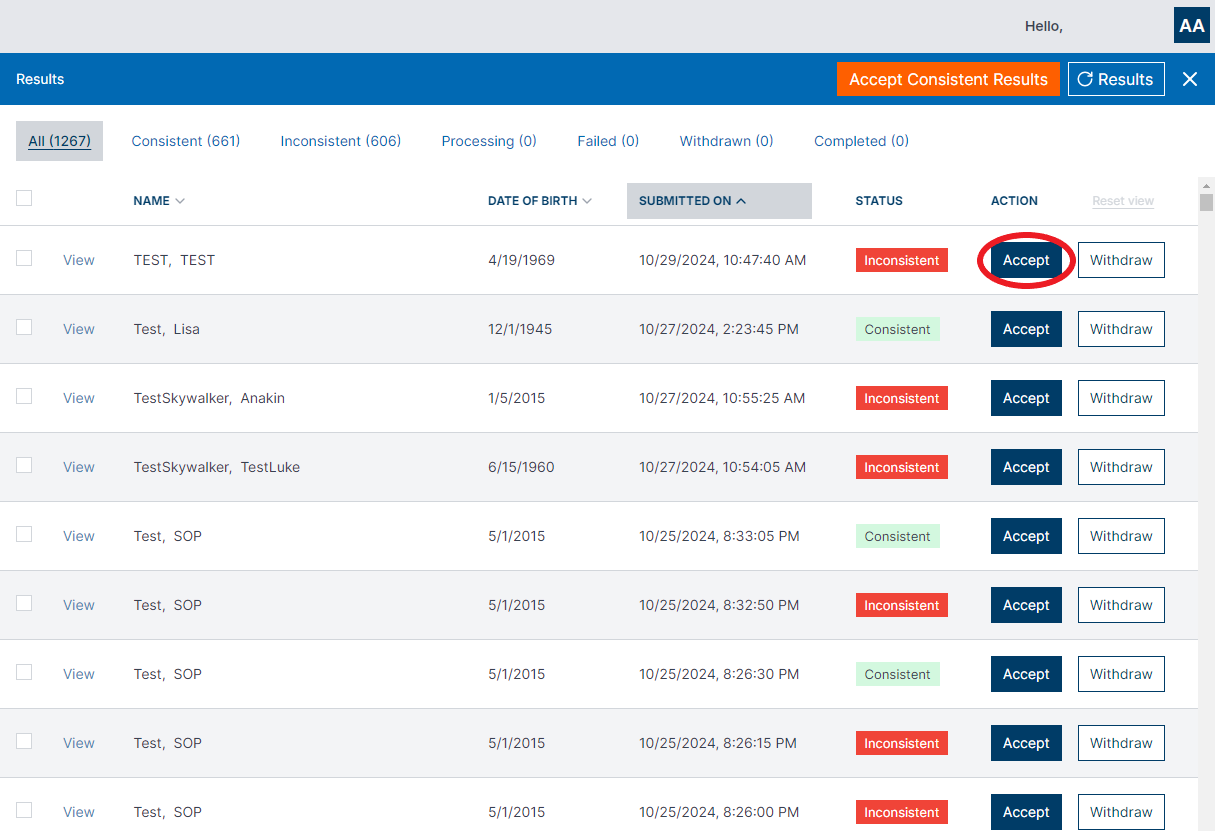
- Click “Accept” to the right of a resulted report. (Figure 1.12)
- In the “Action” column, it will show as Processing, then as Accepted, and then categorized under the Completed tab in the results log with the date and time of completion.
Accepting results when no matching patient is found:
The Shadowbox IRIS platform typically matches patient results to an existing patient chart using our automated matching feature. Shadowbox may fail to locate a patient chart automatically if the patient's information is inconsistent across systems, such as mismatched names, or dates of birth. Additionally, technical issues like EHR system downtime or temporary internet connectivity problems can also hinder chart retrieval.
When no match is found, you can upload results to the patients’ chart manually by following these steps:
- In the Results window, locate the result you want to upload and click “View”. (Figure 1.13)
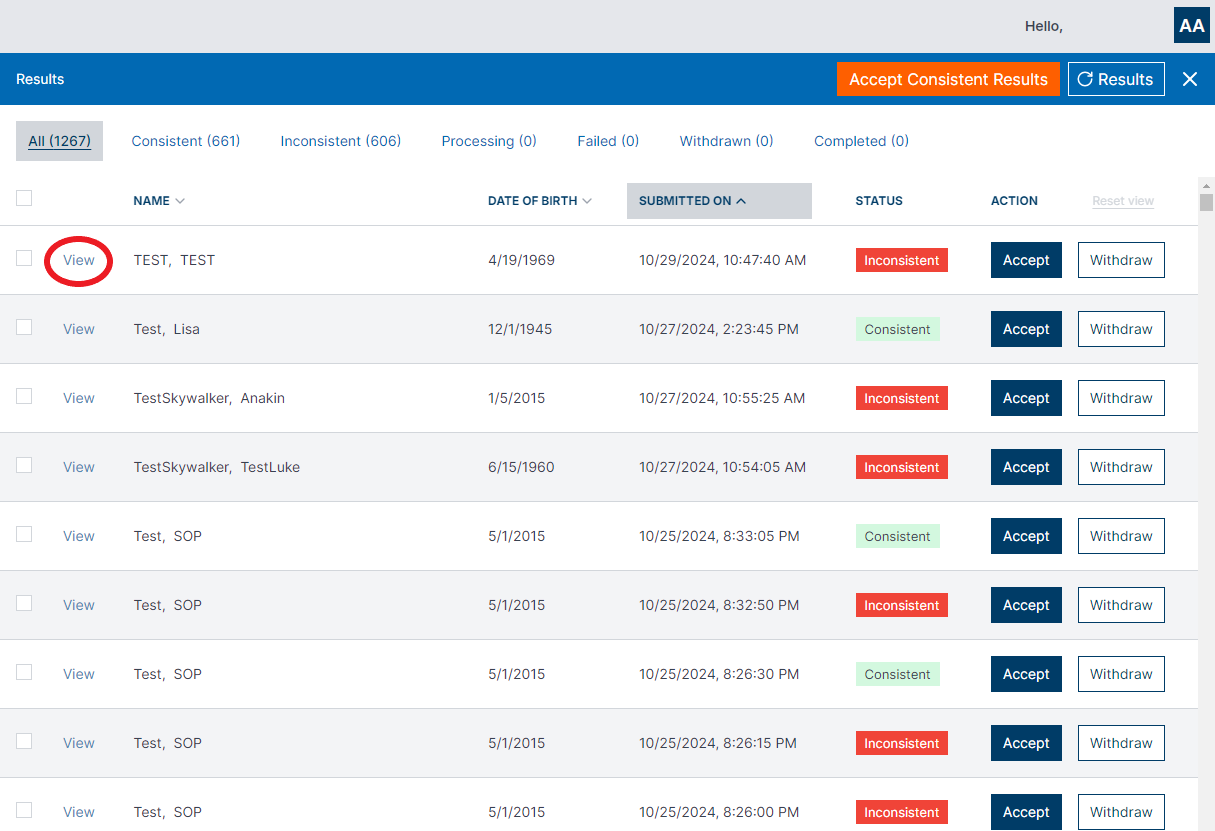
- If no matching patient chart is found, a notification will appear noting that the patient was not found. Close the notification message.
- Using the EHR application on the left side of the screen, use the search bar to locate the patient within the EHR. Once found, open the correct patient chart.
- With the correct patient’s chart open, click the “Accept” button in the “Action” column for the results line item associated with that patient to upload the result.
- Note: The result will be uploaded to the chart currently open. Please ensure the selected chart is correct before proceeding.
- To confirm that the results have been uploaded, access the “Documents” tab within the EHR and validate that the new results document has been added to the list. Note that some EHRs may use a different naming convention or folder for saved documents. The result should now be successfully uploaded and visible in the patient’s chart within their EHR.
Accessing end-user training & videos
Shadowbox provides user guides and videos. Our dedicated Customer Success Team will provide links for end-user training videos, guides and marketing documents via email. Please reach out to support@shadowbox.com if you need access to your training videos guides or marketing documents.
End User License Agreement
THIS END USER LICENSE AGREEMENT (THE "AGREEMENT" or “EULA”) IS A LEGAL AGREEMENT BETWEEN THE ENTITY YOU REPRESENT (E.G., THE HOSPITAL, DOCTOR’S OFFICE, CLINIC THAT EMPLOYS YOU) (THE "END USER") AND SHADOWBOX, INC. ("SHADOWBOX"). BY CLICKING THE "I ACCEPT" BUTTON OR USING THE SHADOWBOX SOFTWARE, YOU ACKNOWLEDGE THAT YOU HAVE, ON BEHALF OF THE END USER, REVIEWED AND ACCEPTED THIS AGREEMENT. YOU REPRESENT THAT YOU HAVE THE AUTHORITY TO BIND THE END USER TO THE TERMS AND CONDITIONS IN THIS EULA.
IF THE END USER DOES NOT AGREE WITH ALL THE TERMS OF THIS AGREEMENT, DO NOT USE THE SHADOWBOX SOFTWARE AND DELETE THE SHADOWBOX SOFTWARE FROM YOUR COMPUTER.
The Shadowbox software to which this EULA applies (the “Shadowbox Software”) allows you and the End User to receive information from and transmit information to the Shadowbox online platform (the “Platform”), all of which intended to help make your workday a little easier. The Shadowbox Software works just like the browser you currently use to access the software applications you use every day but now includes specially created “easy buttons” intended to automate tasks and reduce data entry.
License to the Shadowbox Software:
Subject to the terms and conditions of this EULA and compliance with this EULA, Shadowbox grants the End User a limited, non-transferable, non-exclusive, non-sublicensable, revocable license to download, install and use one (1) copy of the Shadowbox Software, in object code format, on one (1) computer for the sole purpose of interfacing with the Platform.
Reservation:
All rights not granted hereunder are hereby reserved by Shadowbox and, as applicable, by its licensors. The Shadowbox Software is licensed, not sold. This EULA does not grant the End User any title or ownership in the Shadowbox Software and should not be construed as a sale or transfer or transfer of any intellectual property or other rights to the Shadowbox Software.
Restrictions:
End User shall, directly or indirectly, and the End User shall not permit any third party to: (1) reverse engineer, decompile, disassemble or otherwise attempt to discover the object code, source code or underlying ideas or algorithms of the Shadowbox Software or the Platform or analyze the Shadowbox Software or the Platform to learn the details of its design, construction, or production in order to produce a copy or improved version thereof; (2) modify, translate, or create derivative works based on any element of the Shadowbox Software or the Platform or any related documentation; (3) rent, lease, distribute, sell, assign, or otherwise transfer rights to use the Shadowbox Software; (4) remove, disable, or circumvent any security protections or any technical measures that control access to the Shadowbox Software or the Platform; (5) remove any proprietary notices from the Shadowbox Software or any related documentation; (6) publish or disclose to third parties any evaluation of the Shadowbox Software or the Platform without Shadowbox’s prior written consent; (7) use the Shadowbox Software or the Platform for any purpose other than its intended purpose or not in accordance with any provided documentation, including using the Shadowbox Software or the Platform, or any related documentation (or any portion of any of the foregoing) to design, development, create or manufacture any software or service that competes with the Shadowbox Software or the Platform; (8) interfere with the integrity or performance of the Shadowbox Software or the Platform or the Shadowbox services that are made available via the Platform; (9) introduce into the Shadowbox Software or the Platform any copyleft software, open source software (including and software licensed under a license that approved by the Open Source Initiative (www.opensource.org) or any viruses, worms, time bombs, Trojan horses and other harmful or malicious code, malware, files, scripts, agents or programs that may damage the operation of any computer, hardware, device, software or network (“Malicious Code”); (10) use the Shadowbox Software or the Platform send or store data which violates the rights of any individual; (11) use the Shadowbox Software or the Platform in violation of any laws and regulations applicable to the End User’s use of the Shadowbox Software or the Platform; or attempt to gain unauthorized access to the Shadowbox Software or the Platform or their related systems or networks. The End User shall be responsible for its actions and the actions of its users while using the Shadowbox Software and the Platform.
Acceptable Use Policy:
End User acknowledges and agrees:
- to abide by all local, state, national, and international laws and regulations and all contracts to which the End User is a party, in all cases as applicable to the use of the Shadowbox Software or the Platform, including without limitation the provision and storage of data;
- not to send or store data on or to the Shadowbox Software or the Platform which violates the rights of any individual or entity established in any jurisdiction;
- not to upload in any way any information or content that contains Malicious Code or data that may damage the operation of any software, system, computer or mobile device;
- except in compliance with applicable laws and Customer’s contractual obligations, not to upload in any way any data regarding an individual’s financial or economic identity, sexual orientation, religious beliefs, or an individual’s first name and last name, or first initial and last name, or any identifier which may be personally identifiable of an individual, in combination with any one or more of the following data elements that relate to such individual: Social Security number, driver's license number or state-issued identification card number, financial account number, or credit or debit card number, with or without any required security code, access code, personal identification number or password, that would permit access to an individual’s financial account;
- except in compliance with applicable laws and End User’s contractual obligations, not to upload any information comprised of “Protected Health Information” subject to and defined by the Health Insurance Portability and Accountability Act (“HIPAA”);
- not to use the Shadowbox Software or the Platform for illegal, fraudulent, unethical or inappropriate purposes;
- not to interfere with or disrupt networks connected to the Shadowbox Software or the Platform or interfere with other ability to access or use the Shadowbox Software or the Platform;
- not to distribute, promote or transmit through the Shadowbox Software or the Platform any unlawful, harmful, obscene, pornographic or otherwise objectionable material of any kind or nature;
- not to transmit or post any material that encourages conduct that could constitute a criminal offense or give rise to civil liability;
- not to interfere with another customer’s use and enjoyment of the Platform or another person or entity's use and enjoyment of similar services;
- not to use the Shadowbox Software or the Platform in any manner that impairs the Shadowbox Software or the Platform, including without limitation the servers and networks on which the Platform is provided;
- to comply with all regulations, policies and procedures of networks connected to the Shadowbox Software or the Platform and Shadowbox’s service providers;
- not to circumvent any controls or features of the Platform or the Shadowbox Software which are intended to enforce or enable compliance with HIPAA; and
- to use the Shadowbox Software and the Platform only in accordance with any provided documentation.
End User is responsible for creating, implementing and enforcing internal guidelines, policies and procedures, including but not limited to a HIPAA compliant privacy policy, concerning the use and access of personal health information. End User is solely responsible to ensure that its employees and users receive proper HIPAA training and comply with such guidelines, policies and procedures.
End User acknowledges and agrees that Shadowbox neither endorses the contents of any communications, data, or other information nor assumes any responsibility for any offensive material contained therein, any infringement of third-party intellectual property rights arising therefrom or any crime facilitated thereby. Shadowbox may remove any violating content posted or stored using the Shadowbox Software or the Platform or transmitted through the Shadowbox Software or the Platform, without notice to the End User. Notwithstanding the foregoing, Shadowbox does not guarantee, and does not and is not obligated to verify, authenticate, monitor or edit the communications, data, or any other information input into or stored in the Shadowbox Software or the Platform for completeness, integrity, quality, accuracy or otherwise. The End User shall be responsible and liable for the completeness, integrity, quality and accuracy of communications, data, and other information input into the Shadowbox Software or the Platform.
Shadowbox reserves the right to amend, alter, or modify the conduct requirements as set forth in this EULA at any time. Shadowbox may deliver notice of such updated requirements to the End User via email or through the Shadowbox Software or the Platform. End User’s continued access to and use of the Shadowbox Software or the Platform following issuance of such updated requirements shall constitute the End User’s acceptance thereof.
Camera and Microphone Access:
The Shadowbox Software includes optional features that may require access to the End User device’s camera and/or microphone. These features will only function if the End User (a) enables the corresponding settings within the software, and (b) has granted permission through the device’s operating system settings. If the End User device’s operating system restricts access to the camera or microphone for software applications, the software will not be able to access those components. By enabling these features, the End User acknowledges and consents to the software accessing their camera and/or microphone solely for the purposes intended by the application.
Indemnification:
The End User agrees that use of the Shadowbox Software and the Platform shall be at the End User’s own risk. To the fullest extent permitted by applicable law, End User agrees to defend, indemnify and hold harmless Shadowbox, its officers, directors, employees and agents, from and against any and all claims, damages, obligations, losses, liabilities, costs or debt, and expenses (including but not limited to attorney’s fees) arising from: (i) End users use of and access to the Shadowbox Software and the Platform; (ii) the violation of any term of this EULA; (iii) the violation of any third party right, including without limitation any copyright, property, or privacy right; or (iv) any claim that any End User content, including without limitation any communications, data, or other information stored on or processed via the Shadowbox Software or the Platform, caused damage to a third party. This defense and indemnification obligation will survive this EULA and the End User’s use of the Platform.
Disclaimer of Warranties:
THE SHADOWBOX SOFTWARE AND THE PLATFORM ARE PROVIDED “AS-IS,” WITHOUT WARRANTY OF ANY KIND, EITHER EXPRESS OR IMPLIED, INCLUDING WITHOUT LIMITATION ANY WARRANTIES OF MERCHANTABILITY, FITNESS FOR A PARTICULAR PURPOSE, NON‑INFRINGEMENT AND TITLE, QUALITY, SUITABILITY, OPERABILITY, CONDITION, SYSTEM INTEGRATION, NON-INTERFERENCE, WORKMANSHIP, TRUTH, ACCURACY (OF DATA OR ANY OTHER INFORMATION OR CONTENT), ABSENCE OF DEFECTS, WHETHER LATENT OR PATENT, AND ANY WARRANTIES ARISING FROM A COURSE OF DEALING, USAGE, OR TRADE PRACTICE.
Limitation of Liability:
IN NO EVENT SHALL SHADOWBOX OR ITS LICENSORS BE LIABLE FOR LOST PROFITS, SPECIAL, INDIRECT, INCIDENTAL, OR CONSEQUENTIAL DAMAGES RESULTING FROM POSSESSION, USE OR MALFUNCTION OF THE SHADOWBOX SOFTWARE OR THE PLATFORM, ANY LOSSES OR DAMAGES CONNECTED WITH OR CONSISTING OF DAMAGE TO PROPERTY, LOST OR CORRUPTED DATA OR FILES, LOSS OF GOODWILL, COMPUTER, ERRORS AND LOST BUSINESS OR OTHER INFORMATION AS A RESULT OF POSSESSION, USE OR MALFUNCTION OF THE SHADOWBOX SOFTWARE OR THE PLATFORM, EVEN IF SHADOWBOX HAS BEEN ADVISED OF THE POSSIBILITY OF SUCH LOSS OR DAMAGES. SHADOWBOX'S TOTAL AGGREGATE LIABILITY UNDER OR RELATING TO THE SUBJECT MATTER OF THIS EULA IN ALL CASES SHALL NOT EXCEED $100. THE FOREGOING APPLIES EVEN IF ANY LIMITED REMEDY FAILS OF ITS ESSENTIAL PURPOSE.
Term & Termination:
Without prejudice to any other rights of Shadowbox, this EULA shall remain in effect for as long as the End User uses, operates, or runs the Shadowbox Software. This EULA shall terminate automatically if the End User fails to comply with its terms and conditions. Additionally, Shadowbox may terminate this EULA by providing the End User written notice of such termination. Upon termination, the End User must uninstall and delete all copies of the Shadowbox Software. The sections entitled “Reservation,” “Restrictions,” “Acceptable Use Policy,” “Indemnification,” “Disclaimer of Warranties,” “Limitation of Liability,” “Term & Termination,” “Choice of Law & Jurisdiction,” and “Miscellaneous” shall survive any termination of this EULA.
Choice of Law and Jurisdiction:
This EULA, and the rights and obligations of the End User and Shadowbox, shall be construed and enforced under California law as such law is applied to agreements between California residents entered into and to be performed within California, without regard to California’s conflict of law principles. To the extent any claims are governed by federal law, such federal law shall also be applicable. The End User and Shadowbox consent to the exclusive personal jurisdiction of the state and federal courts located in Los Angeles, California, in connection with any claim or dispute concerning this EULA or the subject matter of this EULA, and End User and Shadowbox waive any objection based on venue or the inconvenience of such form. If End User is located outside the United States, the application of the United Nations Convention on Contracts for the International Sale of Goods is expressly excluded. The parties further agree to waive and opt-out of any application of the Uniform Computer Information Transactions Act (UCITA), or any version thereof, adopted by any state of the United States in any form
Amendments:
Shadowbox reserves the right to amend this EULA at any time, in its sole discretion, upon notice to the End User. If any such changes are unacceptable to the End User or cause the End User to no longer be in compliance with the terms and conditions of this EULA, End User shall terminate this EULA, by uninstalling and deleting the Shadowbox Software, as set forth above.
Miscellaneous:
This EULA represents the complete agreement between the End User and Shadowbox regarding the Shadowbox Software and the Platform and supersedes all prior agreements and representations, warranties or understandings between the End User and Shadowbox regarding the subject matter. If any provision of this EULA is held to be unenforceable for any reason, such provision shall be reformed only to the extent necessary to make it enforceable, and the remaining provisions of this EULA shall remain in full force and not be affected. No term or provision of this EULA shall be considered waived by a party, and no breach excused by a party, unless such waiver or consent is in writing signed on behalf of the party against whom the waiver is asserted. No consent by a party to, or waiver of, a breach by a party, whether express
